Watt Quick Start
Welcome to your first steps with Platformatic Watt, the Node.js Application Server. This guide will help you set up and run an application composed of the following stack:
- Next.js frontend, to render our frontend
- Generic
node:httpcreateServer, to showcase how to add an existing Node.js app - Platformatic Gateway, to coordinate/expose them all.
In this guide, we will use Next.js as our frontend framework, but Watt supports many more frameworks including Astro, Remix, Vite, and NestJS. See our Framework Integration Guides for complete details and setup instructions for all supported frameworks.
Prerequisites
Before starting, ensure you have the following installed:
- Node.js (v22.18.0+)
- npm (comes with Node.js)
- A code editor, (e.g., Visual Studio Code)
Set up Watt
npx wattpm create
Which will output:
Hello YOURNAME, welcome to Watt 3.0.0!
? Where would you like to create your project? .
? Which package manager do you want to use? npm
? Which kind of application do you want to create? @platformatic/node
✔ Installing @platformatic/node@^3.0.0 using npm ...
? What is the name of the application? node
? Do you want to create another application? no
? What port do you want to use? 3042
Dependencies are going to be installed. Your application is located in web/node.
The watt.json file is automatically created in the node folder, and the package.json file includes a start script and @platformatic/node as a dependency.
Add your first Node.js application to Watt
By choosing the @platformatic/node application, you have already created your nodejs app.
This file is created as your nodejs app:
import { createServer } from 'node:http'

export function create () {
  return createServer((req, res) => {
    res.writeHead(200, { 'content-type': 'application/json', connection: 'close' })
    res.end(JSON.stringify({ hello: 'world' }))
  })
}
In this example, we are using the built-in node:http module to
create a simple HTTP server that responds with a JSON object containing a counter.
You can see that we are returning a create function that creates the server.
This server will be run by Watt when the application starts in its
own worker thread.
You can also use Express, Fastify, Koa or any other Node.js framework.
Start your Watt server
Run the following command in the root of project to start your Watt server:
npm start
This will internally run wattpm start and start your Watt server.
running npm run start at the root directory is running the watt server. if you run npm run start at the application directory(in this case web/node) it is running that single application via this command from the application package.json script: start-platformatic-node
If you want to have a "watch mode" to automatically restart the server when you make changes, you can run this command in the root directory:
npm run dev
Which will run wattpm dev and start your Watt server in watch mode.
Your first Watt server is now live! 🌟 You can test it with:
curl http://localhost:3042
Add a Platformatic Gateway to run multiple apps
Inside node, let's create a new Platformatic Gateway
npx wattpm create
This will output:
Hello YOURNAME, welcome to Watt 3.0.0!
Using existing configuration ...
? Which kind of application do you want to create? @platformatic/gateway
✔ Installing @platformatic/gateway@^3.0.0 using npm ...
? What is the name of the application? gateway
? Do you want to use TypeScript? no
? Do you want to create another application? no
? Which application should be exposed? gateway
Start your Watt server again:
You can run these commands in the root directory:
npm start
If you want to have a "watch mode" to automatically restart the server when you make changes, you can run this command in the root directory:
npm run dev
Which will run wattpm dev and start your Watt server in watch mode.
Then, you can test it with:
curl http://localhost:3042/node
You can customize how the various applications are exposed by changing web/gateway/platformatic.json.
Here is the equivalent of the default configuration when exposing a Node.js application:
{
  "$schema": "https://schemas.platformatic.dev/@platformatic/gateway/3.0.0.json",
  "gateway": {
    "applications": [
      {
        "id": "node",
        "proxy": {
          "prefix": "/node"
        }
      }
    ],
    "refreshTimeout": 1000
  },
  "watch": true
}
Add a Next.js application to Watt
Inside node, let's create a new Next.js app:
npx create-next-app web/next
Which will output:
✔ Would you like to use TypeScript? … No / Yes
✔ Which linter would you like to use? › ESLint
✔ Would you like to use Tailwind CSS? … No / Yes
✔ Would you like your code inside a `src/` directory? … No / Yes
✔ Would you like to use App Router? (recommended) … No / Yes
✔ Would you like to use Turbopack? (recommended) … No / Yes
✔ Would you like to customize the import alias (`@/*` by default)? … No / Yes
Then, let's import it to our Watt server:
npx wattpm-utils import
This will also install the required dependencies. The command will output:
[13:06:10.996] INFO (42432): Application next is using Next.js. Adding @platformatic/next to its package.json dependencies.
[13:06:10.998] INFO (42432): Installing dependencies for the project using npm ...
[13:06:12.119] INFO (42432): Installing dependencies for the application gateway using npm ...
[13:06:13.092] INFO (42432): Installing dependencies for the application node using npm ...
[13:06:14.310] INFO (42432): Installing dependencies for the application next using npm ...
Then, we need to tell Watt to expose our next server on /next by modifying web/next/watt.json:
{
  "$schema": "https://schemas.platformatic.dev/@platformatic/next/3.0.0.json",
  "application": {
    "basePath": "/next"
  }
}
You can run npm run dev to start your Watt server in dev/watch mode, which in turn will start Next.js
in development mode.
Then, you can test it by opening your browser at http://localhost:3042/next.
In this example, we are exposing the Next.js app at /next and the Node.js app at /node.
You can change the paths to suit your needs. Make sure to alter the basePath in web/next/watt.json
and the prefix in web/gateway/platformatic.json accordingly if you customize it.
fetch the data from the Node.js app in the Next.js app
Replace web/next/src/app/page.js with the following code:
import styles from './page.module.css'

export default async function Home () {
  const { hello } = await (await fetch('http://node.plt.local', { cache: 'no-store' })).json()
  return (
    <div className={styles.page}>
      <main className={styles.main}>Hello {hello}</main>
    </div>
  )
}
This will fetch the data from the Node.js app and display it in the Next.js app.
Note that it uses the node.plt.local hostname, which is the internal hostname for the node application.
This domain name would not work outside of a Watt or Platformatic environment.
By default Next.js caches all fetch() requests.
The { cache: 'no-store' } option is used to disable caching, so that you can see the counter incrementing.
Launch it with: npm run dev.
You can now test it by opening your browser at http://localhost:3042/next.
Build and Production mode
To create a build for production, you can run wattpm build, which is exposed as npm script:
npm run build
Which will in turn create a build for Next.js and for the Node.js app (in case that is needed).
To run the server in production mode, you can run:
npm run start
which will call wattpm start.
Debug individual applications with Chrome DevTools
You can debug your Watt server with Chrome DevTools by running:
npm run start -- --inspect
This will start an inspector instance in each application, and you can connect to it with Chrome DevTools.
Open chrome://inspect in Chrome, and you will see the applications listed there.
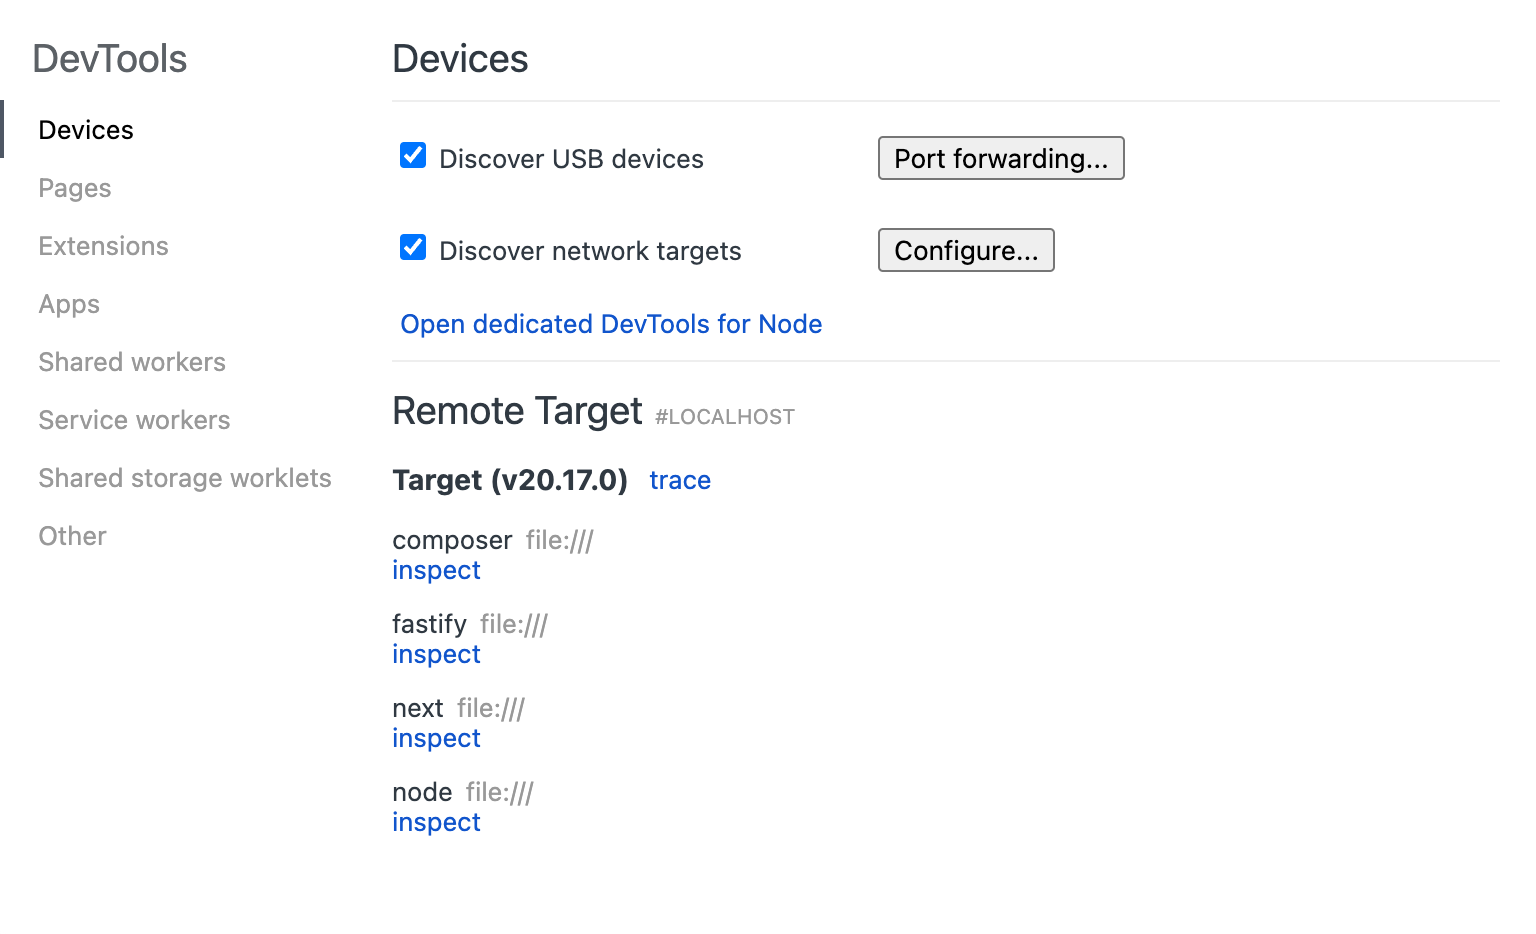
Then, you can click on inspect to open the DevTools for that application.
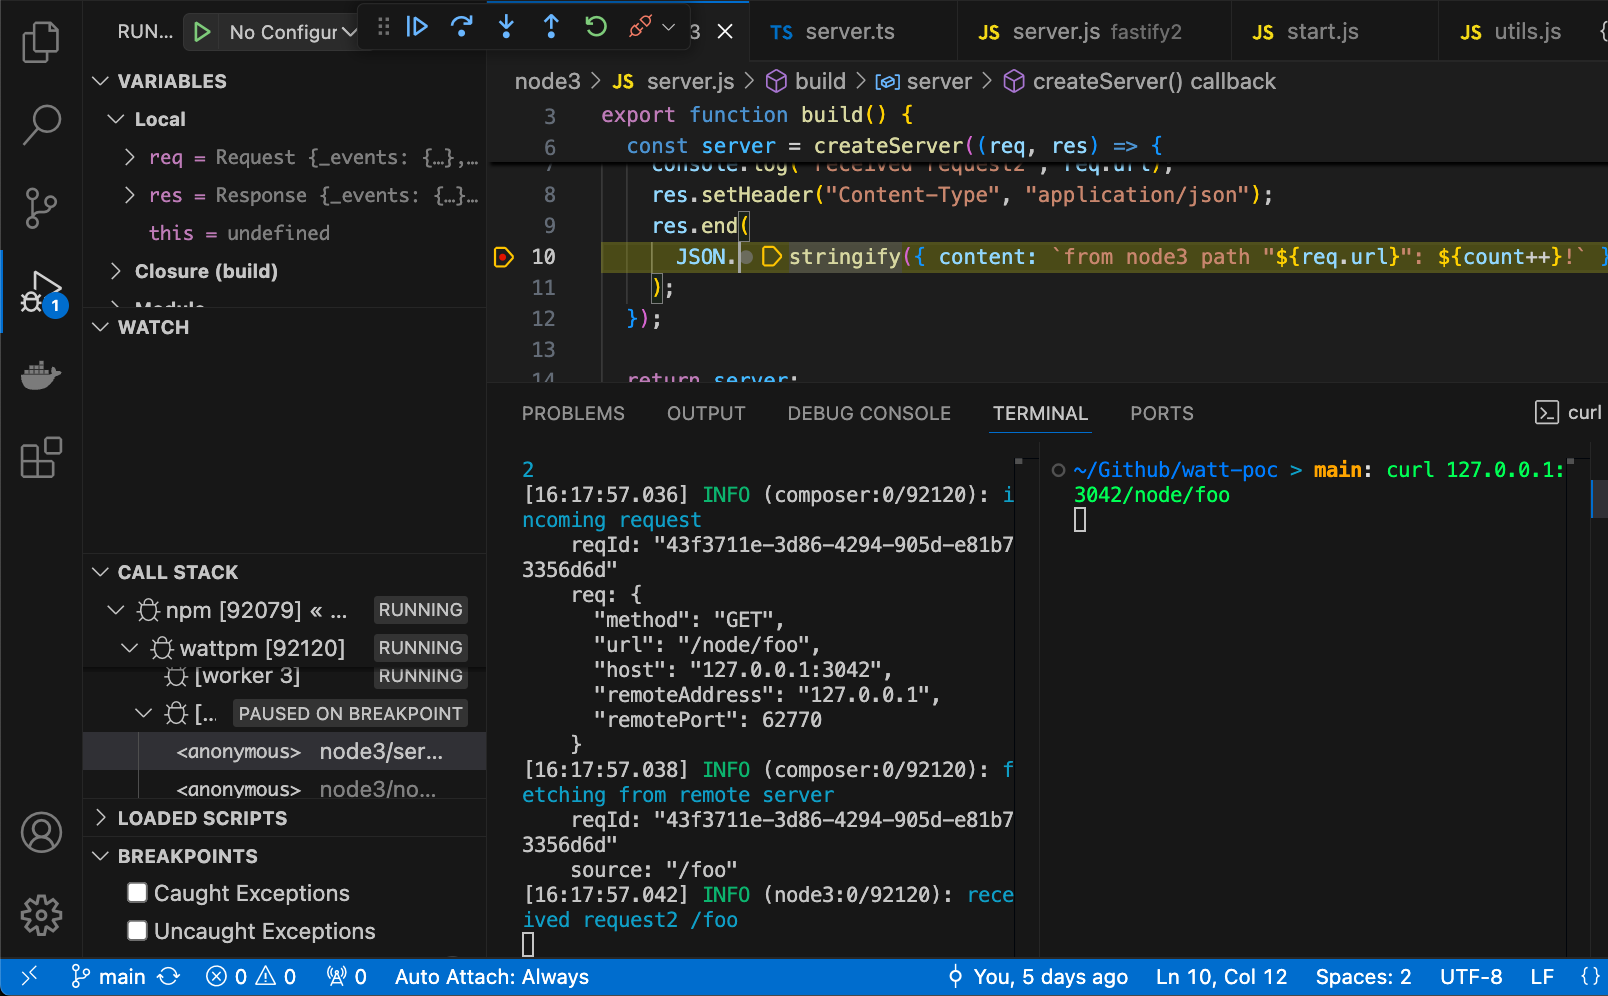
Debug individual applications with VS Code
You can debug the code of individual Watt applications directly in VS Code.
To run the debugger in VS Code:
- add a breakpoint in your Watt application code
- open the
Command Palette(Ctrl+Shift+Pon Windows,CMD+Shift+Pon Mac) - search
Debug: Toggle Auto Attach, then selectAlwaysfrom the list of options - run watt with
npm run dev - you should now see in your shell a log that confirms that the debugger is listening
Debugger listening on ws://127.0.0.1:62807/6132054c-766e-4d86-a716-f634118275ed
For help, see: https://nodejs.org/en/docs/inspector
Debugger attached.
- do a request to your application, to trigger the breakpoint code, and use VS Code to debug it as by the following screenshot